
Taking screenshots has become an essential part of our digital lives, whether it’s capturing a funny meme, saving important information, or showcasing your work.
But reaching for your mouse and clicking menus can be time-consuming. Luckily, both Mac and Windows offer a variety of keyboard shortcuts for quick and efficient screenshot capture.
Why Use Keyboard Shortcuts for Screenshots?
Capturing your screen is a common task, whether for work, personal use, or sharing information. Using keyboard shortcuts for screenshots offers a range of benefits that go beyond mere convenience.
Time-saving Benefits: Imagine you don’t have to search through menus or use extra apps each time you want to take a screenshot. With keyboard shortcuts, it’s super quick. You can capture your screen instantly, so you can stay focused on your work without any interruptions.
Increased Productivity: Using keyboard shortcuts for screenshots makes you faster. It’s like a computer magic trick, saving you time. Imagine all those saved minutes adding up, giving you more time for the fun stuff. So, it’s not just about handy screenshots; it’s like having a superpower for your computer life.
Accessibility Features: Keyboard shortcuts help everyone, especially those with difficulty moving, take screenshots easily. This means that technology is powerful in meeting the needs of different people.
Standard Keyboard Shortcuts for Screenshot in Mac
Mac users are no strangers to their devices’ sleek and intuitive design. To complement this, Apple provides users with straightforward Keyboard Shortcuts for Screenshots.
Command + Shift + 3 for Full-screen Capture:
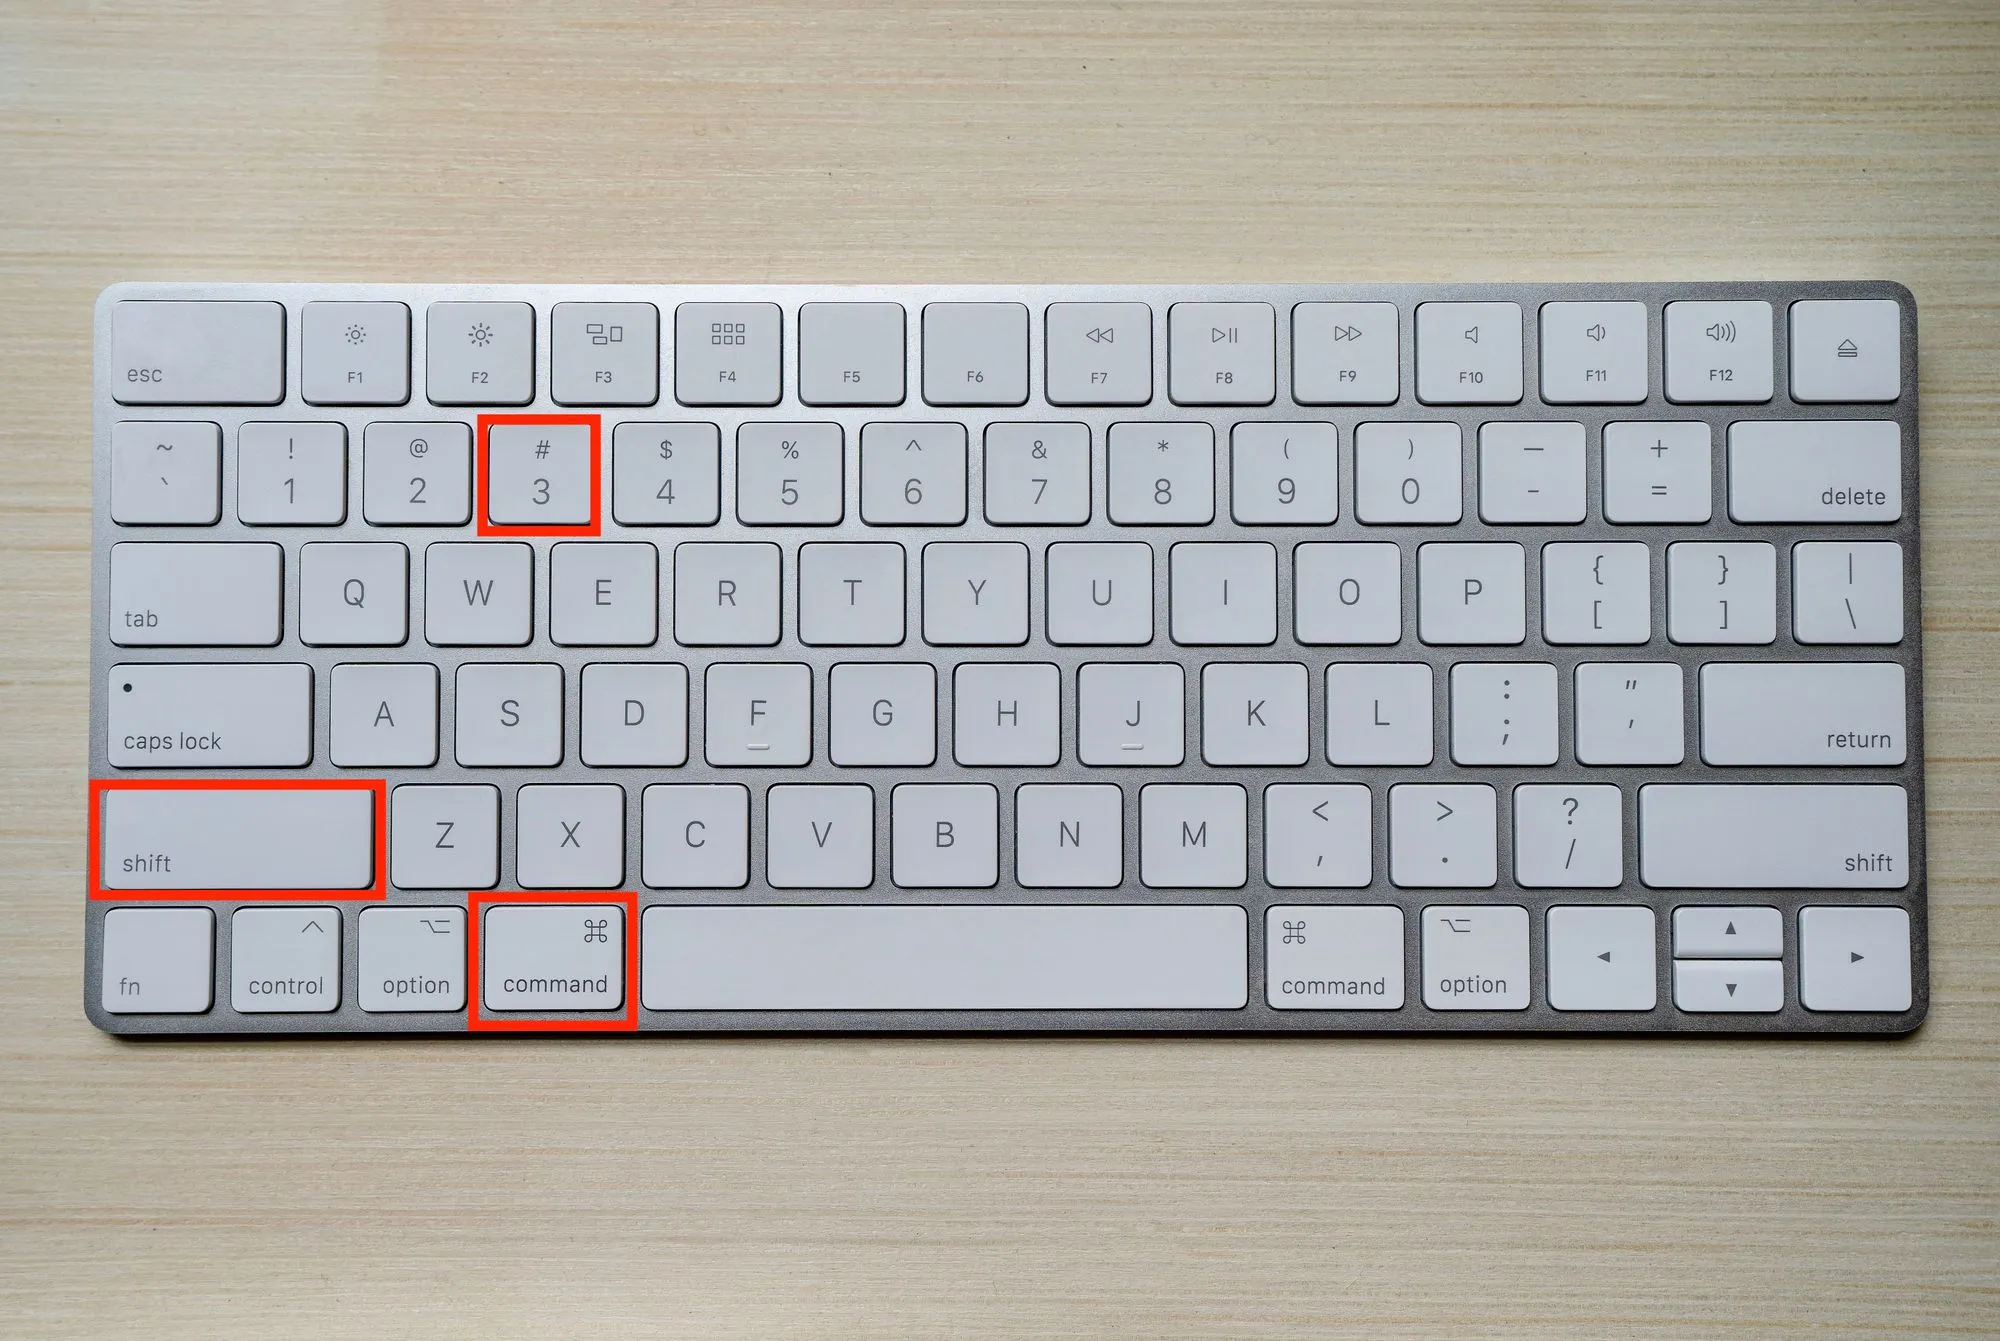
- When you press and hold the “Command” key on your keyboard and simultaneously press the “Shift” key, you can capture the entire contents of your screen.
- This means everything you see on your monitor, from the top to the bottom and left to right, will be captured in the screenshot.
Command + Shift + 4 for Selective Area Capture:
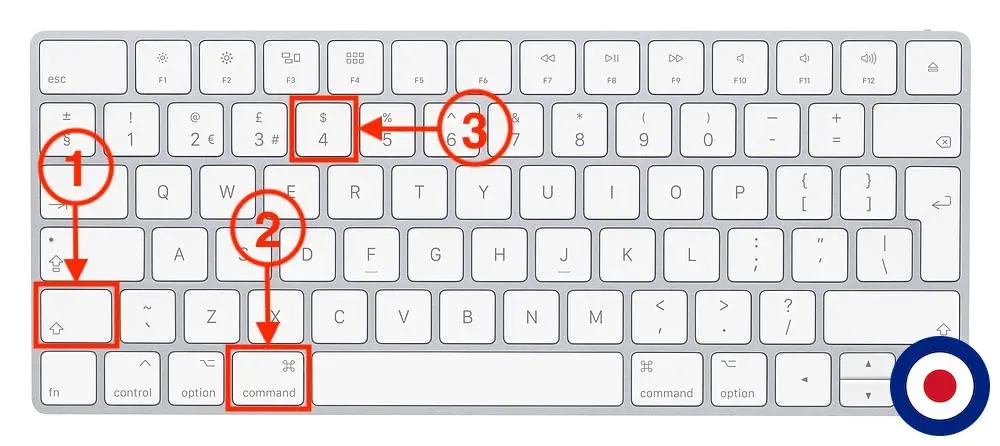
- Pressing the “Command” key, along with the “Shift” key and the “4” key, allows you to capture a specific area of your screen.
- After pressing these keys, your cursor will change into a crosshair. You can click and drag to select the portion of the screen you want to capture.
Command + Shift + 4, then Space for Window Capture:
- This combination is a bit more specific. After pressing “Command” + “Shift” + “4,” you then press the “Space” key.
- This turns the cursor into a camera icon, allowing you to capture a specific window. Move the camera icon over the window you want to capture and click to take the screenshot.
Advanced Mac Keyboard Shortcuts for Screenshot
For users looking to customize their screenshot experience on Mac, there are advanced shortcuts that offer additional control.
Adding Control to Capture to the Clipboard:
The standard Mac screenshot shortcuts are powerful, but adding the Control key provides an extra feature—capturing to the clipboard.
When you press Command + Shift + 3 or Command + Shift + 4 while holding down the Control key (Command + Shift + Control + 3 or Command + Shift + Control + 4), the captured screenshot is not immediately saved as a file.
Instead, it’s copied directly to your clipboard. This means you can quickly paste it into other applications, such as image editors or document processors, without having to save it as a file first.
Including the Option for Capturing a Specific Window
The Command + Shift + 4 shortcut allows you to select a specific area for capture, but if you introduce the Option key (Command + Shift + Option + 4), it transforms the cursor into a crosshair that lets you capture a specific window.
When you press this combination, you’ll notice that the crosshair changes to a camera icon. Clicking on a window will capture that window exclusively, ignoring the rest of the screen.
This is particularly useful when you want to focus on a single application or window without capturing unnecessary elements in your screenshot.
Windows Keyboard Shortcuts for Screenshot
Windows users fear not! Microsoft has equipped its operating system with handy keyboard shortcuts for capturing screenshots.
Print Screen for Full-screen Capture:
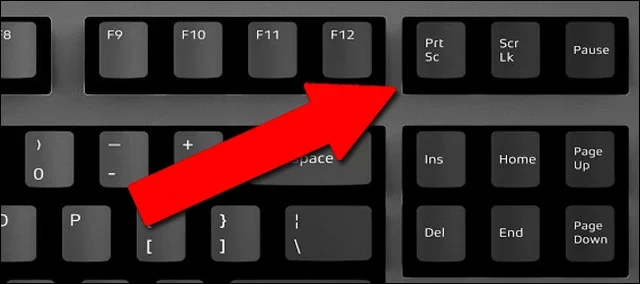
- When you press the “Print Screen” key (often labeled as “PrtSc” or “PrtScn“) on your keyboard, Windows captures an image of your entire screen.
- To view or use the captured screenshot, you need to paste it into an image-editing program like Microsoft Paint or any other graphic software.
- This is a quick way to capture everything displayed on your monitor.
Alt + Print Screen for the Active Window:
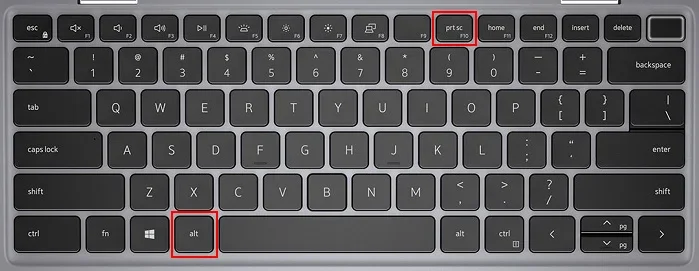
- Pressing “Alt + Print Screen” captures only the active window, the one that is currently in focus.
- Like the full-screen capture, you’ll need to paste the screenshot into an image editor to save or edit it.
- This is useful when you want to capture a specific window without including the entire desktop.
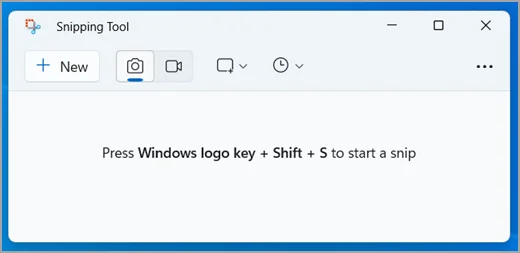
Windows + Shift + S for Selective Area Capture (Windows 10 and above):
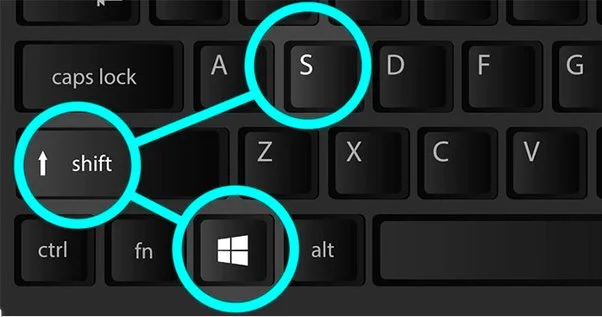
- This shortcut is a part of the Snipping Tool, which is available on Windows 10 and newer versions.
- When you press “Windows + Shift + S,” your screen will fade, and a selection menu will appear.
- You can then click and drag to choose a specific area of the screen that you want to capture.
- The captured screenshot is copied to the clipboard and can be pasted into an image editor or any other application.
These shortcuts provide Windows users with versatile options for capturing screenshots, whether it’s the entire screen, a specific window, or a user-defined area. They are handy tools for quickly grabbing visual information without the need for third-party applications.
Utilizing the Snipping Tool on Windows
Windows users can also take advantage of the built-in Snipping Tool for more flexibility in their screenshot endeavors.
Overview of Snipping Tool Features
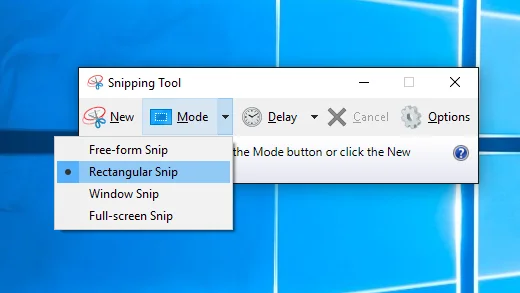
The Snipping Tool is a built-in application on Windows that provides users with a simple yet powerful way to capture screenshots. It offers several features to cater to different preferences and requirements.
Free-form Snip:
- Allows users to draw irregular shapes around the area they want to capture. Ideal for capturing specific parts of the screen with a more flexible outline.
Rectangular Snip:
- Enables users to capture a precise rectangular area. This mode is great for capturing well-defined sections of the screen.
Window Snip:
- Specifically captures an entire window, making it convenient for those who want to focus on a particular application or dialog box.
Full-screen Snip:
- Captures the entire screen. This mode is useful when you need to capture everything displayed on your monitor.
How to Use the Snipping Tool for Various Screenshot Needs
Using the Snipping Tool is straightforward and user-friendly. Here’s a step-by-step guide on how to make the most of its features:
Open the Snipping Tool:
- Press the
Startbutton and type “Snipping Tool” in the search bar. Select the application from the results.
Select Your Snip Mode:
- Once the Snipping Tool is open, click on the dropdown menu next to “New” to choose your preferred snip mode: Free-form, Rectangular, Window, or Full-screen.
Capture the Screenshot:
- After selecting the snip mode, position the cursor at the starting point of your capture and click and drag to define the area you want to capture.
Annotate (Optional):
- The Snipping Tool provides basic annotation tools. After capturing the screenshot, you can use the pen, highlighter, and eraser tools to annotate or emphasize specific parts of the image.
Save or Share the Screenshot:
- Once you’re satisfied with your capture and annotations, click on
Fileand select eitherSave Asto save the screenshot to your device orCopyto copy it to the clipboard for immediate use in other applications.
Choose the File Type:
- When saving the screenshot, the Snipping Tool allows you to choose the file type (PNG, JPEG, GIF, or HTML). Select the appropriate format based on your needs.
Name and Save the File:
- Give your screenshot a descriptive name and choose the destination folder on your computer. Click
Saveto store the image.
Third-Party Tools for Enhanced Screenshot Capabilities
In the world of screenshots, there’s more to explore beyond the built-in features of your operating system. Third-party tools offer enhanced capabilities, providing users with advanced options for capturing, editing, and sharing screenshots. Two notable tools in this category are Snagit and Lightshot.
While native shortcuts are powerful, third-party tools can take screenshot capabilities to the next level.
Snagit for Advanced Editing and Annotations
Snagit is a powerhouse when it comes to screenshot tools. It goes beyond simple screen captures, offering a range of features for users who require more extensive editing and annotation options.
Key Features:
- Capture with Precision: Snagit allows users to capture the entire screen, specific windows, or custom-selected areas. This flexibility ensures that you can capture exactly what you need.
- Advanced Editing Tools: Once you’ve captured your screenshot, Snagit provides a suite of editing tools. From basic functions like cropping and resizing to more advanced features like adding shapes, text, and arrows, Snagit has you covered.
- Annotations and Callouts: Communicate effectively with your audience by adding annotations, callouts, and highlights to your screenshots. This is especially useful for instructional materials, presentations, or collaborative projects.
- Step-by-Step Workflows: Snagit simplifies complex processes by allowing you to create step-by-step documentation using screenshots. This is invaluable for tutorials or instructional guides.
- Screen Recording: Beyond static screenshots, Snagit includes a screen recording feature. Capture video of your screen actions with the same level of precision and editing capabilities.
- Cross-Platform Compatibility: Whether you’re on Windows or Mac, Snagit is available on both platforms, providing a consistent experience for users across different operating systems.
Why Choose Snagit?
- Professional Documentation: Ideal for professionals, educators, and anyone who needs to create polished and professional-looking documentation.
- Collaborative Projects: Enhance collaboration by easily sharing annotated screenshots and instructional content.
- Versatility: With its comprehensive set of features, Snagit is versatile enough to meet the demands of various users.
Lightshot for Quick and Easy Captures with Instant Sharing Options

Lightshot takes a different approach, focusing on simplicity and speed. If you’re looking for a tool that allows for quick captures and easy sharing, Lightshot might be the perfect fit.
Key Features:
- Instant Capture: Lightshot lives up to its name by offering instant capturing. Simply select the area you want to capture, and Lightshot does the rest with minimal interruption to your workflow.
- Annotation Tools: While not as extensive as Snagit, Lightshot provides basic annotation tools. Add text, shapes, and highlights to convey your message effectively.
- Quick Sharing Options: After capturing a screenshot, Lightshot allows for swift sharing. Easily share your screenshots via social media, email, or by generating a link.
- Cloud Storage Integration: Lightshot integrates with cloud storage services, offering convenient options for storing and accessing your screenshots from different devices.
- Cross-Platform Compatibility: Like Snagit, Lightshot is available on both Windows and Mac, catering to users across different platforms.
Why Choose Lightshot?
- Speed and Simplicity: Lightshot excels in its user-friendly interface and quick capture abilities, making it an excellent choice for users who prioritize speed and simplicity.
- Casual Users: If your screenshot needs are more casual and you prefer a tool that doesn’t overwhelm you with features, Lightshot is a great, easy-to-use option.
- Instant Sharing: Perfect for those who need to share screenshots rapidly, Lightshot’s quick sharing options streamline the process.
Tips for Efficient Screenshot Workflow
Capturing screenshots is one thing, but organizing and managing them effectively is another. Here are some tips for maintaining a streamlined screenshot workflow on both Mac and Windows.
Organizing Screenshots on Both Mac and Windows
When it comes to capturing screenshots regularly, it’s essential to establish an organized system for storing them. Here’s how you can efficiently organize your screenshots on both Mac and Windows:
Create Dedicated Folders:
- Start by creating dedicated folders for your screenshots. This helps keep them in one central location, making it easier to locate them later.
- On both Mac and Windows, you can create folders on your desktop or within existing directories.
Organize by Project or Topic:
- Further, enhance your organization by creating subfolders based on projects or topics. This way, you can categorize your screenshots, making it a breeze to find the relevant ones.
Use Descriptive File Names:
- Give your screenshot files meaningful and descriptive names. Avoid generic names like “Screenshot_1” and instead opt for names that reflect the content or purpose of the screenshot.
Date-Based Organization:
- Consider organizing your folders by date. This is particularly useful if you take numerous screenshots daily, as it provides a chronological order for your captures.
Regularly Review and Clean Up:
- Periodically review your screenshot folders and delete any unnecessary or outdated captures. This helps maintain a clutter-free space and ensures you only keep what’s truly needed.
Renaming and Categorizing Screenshots for Easy Retrieval
Once you’ve organized your screenshots, the next step is to ensure each screenshot is easily identifiable through its name and category. Here’s how to achieve that:
Meaningful File Names:
- Take the time to give each screenshot a meaningful and descriptive file name. This could include keywords related to the content, project names, or specific details about the capture.
Batch Renaming:
- If you have a series of screenshots related to the same project or topic, consider using batch renaming features available on both Mac and Windows. This allows you to rename multiple files simultaneously, maintaining consistency.
Include Relevant Information:
- Include relevant information in the file name, such as the date, project name, or any specific details that help you recall the context of the screenshot.
Add Tags or Labels:
- Some operating systems, especially Mac, allow you to add tags or labels to files. Take advantage of this feature to further categorize your screenshots. For instance, you could use tags like “Work,” “Personal,” or “Urgent.”
Create a Naming Convention:
- Establish a naming convention for your screenshots and stick to it. Consistency in naming makes it easier to search and retrieve specific captures when needed.
Blank Screenshots and How to Address Them
Issue: Blank screenshots can be frustrating, especially when you expect a snapshot of your screen’s content. This issue may occur due to a variety of reasons.
Possible Causes:
- Permissions Issues: Sometimes, the application or system might not have the necessary permissions to capture the screen.
- Interference from Third-Party Applications: Certain third-party applications or security software can interfere with the screenshot process, resulting in blank captures.
How to Address:
- Check Permissions: Ensure that the application or system has the required permissions to capture the screen. Review and adjust the settings in your system preferences or security settings.
- Disable Conflicting Apps: Temporarily disable any third-party applications that might be conflicting with the screenshot process. This can be done by closing them or adjusting their settings to allow screen capture.
- Restart the System: Sometimes, a simple system restart can resolve temporary glitches. Close all applications, restart your computer, and try capturing the screenshot again.
The Future of Screenshot Shortcuts
As technology continues to evolve at a rapid pace, the realm of keyboard shortcuts for screenshots is not exempt from innovation. Let’s explore the potential advancements in this technology and the exciting prospect of integrating voice and gesture commands.
Gesture-Based Screenshot Shortcuts
In the future, capturing screenshots may involve simple gestures. Imagine a world where a wave of your hand or a specific gesture triggers the screenshot function, making the process even more intuitive and hands-free. This potential innovation could redefine how we interact with our devices.
Voice-Activated Screenshot Commands
Voice commands have become commonplace with virtual assistants, and integrating them into screenshot shortcuts is on the horizon. Uttering phrases like “Capture this” or “Take a screenshot” could seamlessly initiate the process, offering users an efficient and voice-driven alternative.
Customizable Shortcut Profiles
Personalization is key in the evolving landscape of technology. Future advancements may bring customizable shortcut profiles, allowing users to define their unique combinations of keys, gestures, or voice commands. This level of customization promises a more personalized and efficient user experience.
Intelligent Context-Aware Shortcuts
Imagine shortcuts that adapt to your context. In the future, the system might intelligently offer relevant options based on your current task. Whether working on a design project or other specific tasks, these context-aware shortcuts would add a layer of smart automation to the screenshot process.
Enhanced Editing Capabilities within Shortcuts
Future screenshot shortcuts could integrate basic editing features directly into the process. After capturing a screenshot, users might have the option to annotate, crop, or highlight elements using intuitive keyboard commands. This streamlining eliminates the need for a separate editing tool.
Cross-Platform Synchronization
With users operating across multiple devices, future screenshot shortcuts may offer seamless synchronization. Capturing a screenshot on one device could instantly make it accessible to others within the same ecosystem. This integration caters to the demand for continuity in our digital experiences.
Virtual Reality (VR) Screenshot Shortcuts
As virtual reality becomes mainstream, the future of screenshot shortcuts might extend into the virtual realm. Specially designed shortcuts could allow users in VR experiences to capture their virtual environment or specific moments within immersive settings.
FAQs
How do I take a screenshot of a specific area on my Mac?
Press Shift + Command + 4. Your cursor will change into a crosshair. Drag the crosshair to select the area you want to capture, then release the mouse or trackpad button. The screenshot will be saved to your desktop.
How do I capture a window on Windows?
Hold down the Alt key and click on the window you want to capture. The window will be copied to the clipboard. You can then paste it into an image editing program like Paint to save it as a file.
How do I change the screenshot format on Windows?
Open the Snipping Tool app. Click on the File menu, then select Save As. Choose the desired Format (PNG, JPEG, etc.) from the Save as Type dropdown menu.
How do I set a Custom Screenshot Shortcut on Windows?
1. Open the Settings app.
2. Go to System > Ease of Access > keyboard.
3. Click on the Change shortcut keys.
4. Scroll down to Print Screen and click on it.
5. Choose the desired shortcut (e.g., Ctrl + Shift + S).
How do I change the Screenshot format on my Mac?
Open the Screenshot app (located in Application > Utilities). Click on Options in the menu bar, then select the desired format (PNG, JPEG, etc.) from the format dropdown menu.
How do I capture a scrolling area on Windows?
1. Use the Snipping Tool app.
2. Select the Rectangular Clip mode.
3. Drag the Selection box over the area you want to capture.
4. Scroll down the window as you hold the left mouse button.
5. Release the mouse button when you are finished.
How do I delay a screenshot on a Mac?
1. Open the Screenshot app.
2. Click on the Options in the menu bar.
3. Check the box next to the Timer.
4. Choose the desired delay (5, 10, or 15 seconds).
Conclusion
In conclusion, Keyboard Shortcuts for Screenshots offer a swift and efficient way to capture your screen in both Mac and Windows environments. They save time, increase productivity, and enhance accessibility.
These shortcuts provide users with control and customization options, contributing to a streamlined workflow. As we conclude, it’s essential to recognize and embrace these benefits.
Encouraging readers to make Keyboard Shortcuts for Screenshots a part of their daily routine is a call to enhance their digital experience. By doing so, users can navigate their tasks with ease and efficiency, making the integration of shortcuts a valuable addition to their digital toolkit.


