
Have you ever felt the frustration of fumbling through menus and settings to record a simple screen capture? Well, fret no more! Keyboard shortcuts are your secret weapon for capturing your digital world with lightning speed and efficiency.
Screen recording is like taking a video of what’s happening on your computer or laptop screen. It’s useful when you want to show someone how to do something on your computer or capture a moment during a presentation or gameplay.
Whether you’re a Mac magician or a Windows whiz, this guide will equip you with the essential keyboard combos to transform your screen recording workflow.
They make screen recording faster and easier, like a secret language between you and your computer. So, grab your keyboard, channel your inner shortcut ninja, and get ready to rule the realm of screen recordings!
Mac Keyboard Shortcuts to Record Screen
These keyboard shortcuts, specifically designed for Mac computers, provide users with quick and efficient ways to perform screen-related actions.
Command + Shift + 5:
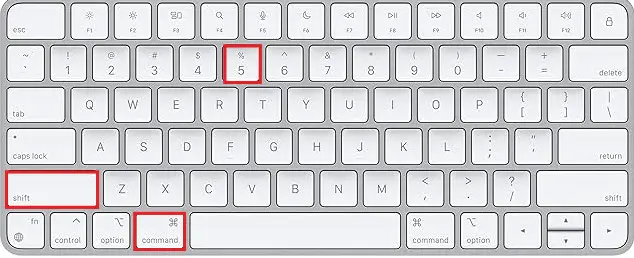
This combination opens a menu on your Mac that offers various options for screen recording and capturing. It provides a user-friendly interface for selecting the area of the screen you want to record, whether it’s the entire screen, specific windows, or custom-selected portions. Additionally, it includes options for setting a timer and choosing where to save the recording.
Command + Shift + 4:
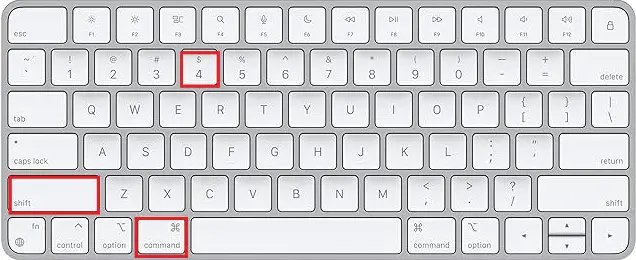
Similar to Command + Shift + 3, this shortcut allows you to capture a selected portion of the screen. When activated, it turns your cursor into a crosshair, and you can click and drag to choose the area you want to capture. Once you release the mouse button, the selected portion is captured and saved to your desktop.
Command + Shift + 3:
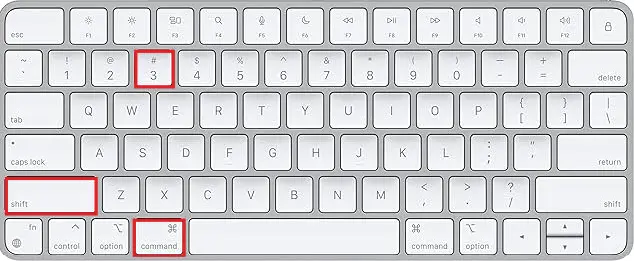
This shortcut is designed for capturing the entire screen. When you press Command + Shift + 3, your Mac will take a screenshot of the entire display and save it to your desktop by default. It’s a quick way to capture what’s currently visible on your screen without the need for additional steps.
Windows Keyboard Shortcuts to Record Screen
Windows + Shift + S:
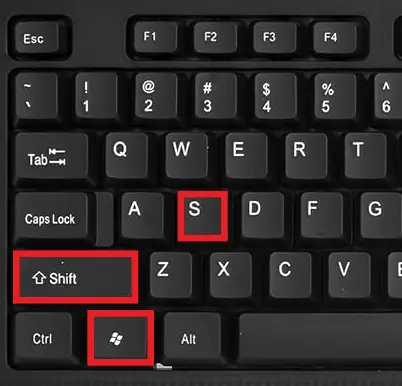
When you press the combination of the “Windows” key and “Shift” key along with “S,” it activates a feature on Windows known as the Snipping Tool or Snip and Sketch, depending on the version. This shortcut allows you to take a screenshot of a specific area of your screen.
After pressing these keys, you can click and drag to select the region you want to capture, and the selected area will be copied to your clipboard, ready to be pasted or saved.
Windows + Alt + R:
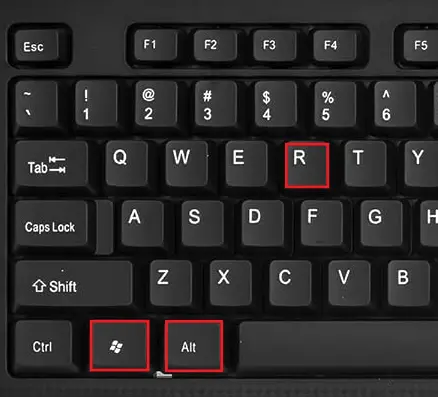
This keyboard shortcut is specifically designed for gamers using Windows 10. When you press the “Windows” key, “Alt” key, and “R” key together, it initiates and stops the recording of your gameplay using the Xbox Game Bar. This feature is handy for gamers who want to capture and share their gaming experiences.
Windows + G:
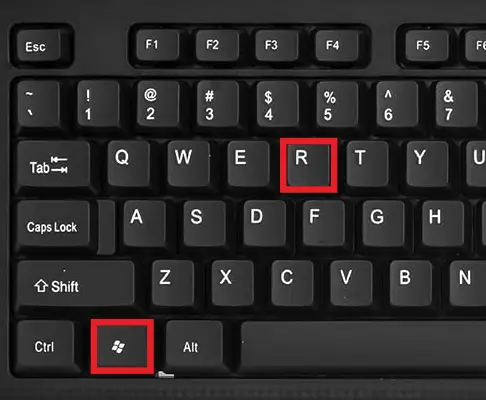
Pressing the “Windows” key and “G” key activates the Game Bar on Windows. This bar provides various gaming-related features, including the ability to record gameplay, take screenshots, and access Xbox features. It’s a quick way for gamers to access essential functions while playing games on their Windows/ system.
Benefits of Using Keyboard Shortcuts to Record Screen
Time Efficiency:
- Keyboard shortcuts eliminate the need to navigate through menus and options using a mouse or touchpad.
- By pressing a combination of keys, users can perform tasks more quickly, saving valuable time in the process.
- This is particularly beneficial for repetitive actions, as it reduces the overall time spent on executing commands.
Seamless Workflow:
- Using keyboard shortcuts creates a smoother and more seamless workflow by reducing interruptions.
- Users can transition between tasks without breaking their concentration, as they don’t have to divert their attention to the mouse or on-screen options.
- The seamless flow contributes to a more focused and efficient work environment.
Increased Productivity:
- Mastering keyboard shortcuts leads to increased productivity by streaming operations.
- Users become more adept at navigating and controlling their devices, resulting in a more productive and efficient computing experience.
- The ability to swiftly execute commands without disrupting the work rhythm enhances overall productivity levels.
How to Customize Shortcuts
Both Mac and Windows offer built-in screen recording tools with default keyboard shortcuts. However, you can customize these shortcuts for a smoother workflow.
Mac Customization Steps:
- Access System Preferences: Click on the Apple logo in the top-left corner of your screen, and select “System Preferences” from the dropdown menu.
- Navigate to Keyboard Settings: In the System Preferences window, Locate and click on the “keyboard” icon.
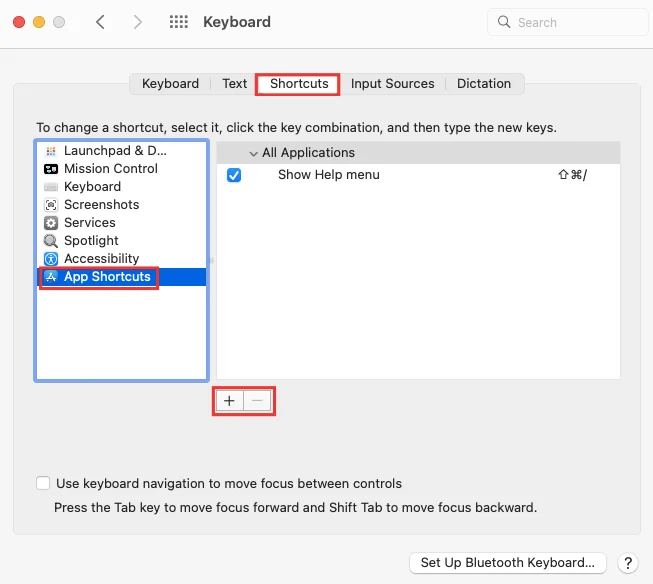
- Select Shortcuts Tab: Within the Keyboard settings, there will be a tab labeled “Shortcuts.” Click on it to access customization options.
- Modify App Shortcuts: In the Shortcuts tab, you will find a list of categories on the left side. Choose “App Shortcuts” to customize keyboard shortcuts for specific applications.
- Add or Edit Shortcuts: To add a new shortcut, click the “+” button, select the desired application from the Application dropdown, type the exact menu title of the command you want to customize, and then enter your preferred keyboard shortcut.
- Remove Shortcuts: To remove a custom shortcut, select it in the list, and click the “-” button.
- Apply Changes: Once you’ve made your changes, close the system Preferences window. Your custom keyboard shortcuts should now be in effect.
Windows Customization Steps:
- Access Settings: Open the Start menu and select “Setting” (gear icon).
- Go to Gaming Settings: In the Settings window, find and click on the “Gaming” category.
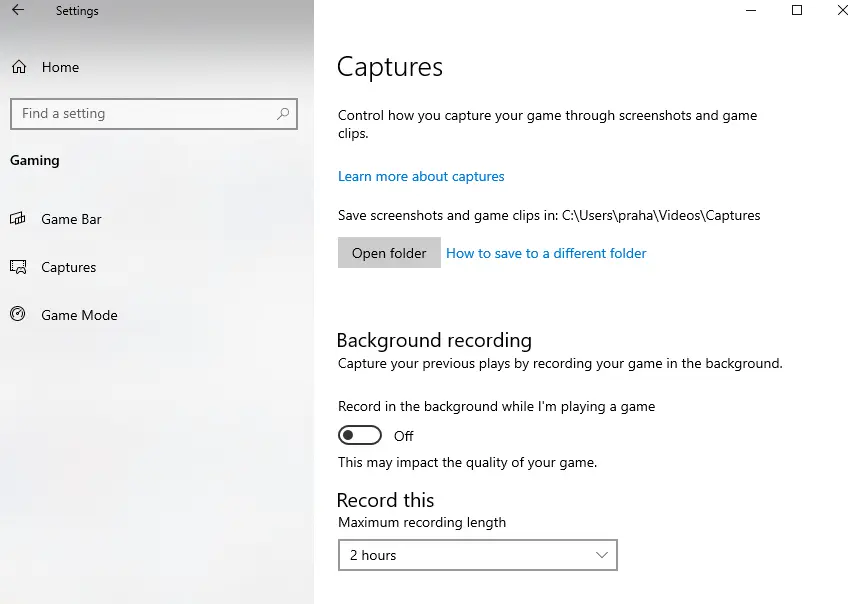
- Navigate to Captures: Within the Gaming settings, select “Captures” from the left sidebar. This section is specifically for screen recording and capture options.
- Customize Shortcuts: Look for the “Keyboard shortcuts” section. Here, you can customize the keyboard shortcuts for various capture options on Windows.
- Add or Change Shortcuts: Click on the shortcuts you want to change, and then press the new key combination you want to assign. The system will automatically update to your new choice.
- Apply Changes: Once you’ve set up your desired shortcuts, close the Settings window. Your new keyboard shortcuts for screen recording should now be active.
Troubleshooting Common Issues
Audio Problems
Audio problems refer to issues related to the sound quality or presence of audio in your screen recordings. If you encounter audio problems, consider the following troubleshooting steps:
- Checking Microphone Settings: Ensure that your microphone is properly connected and configured. Adjust the microphone settings on your computer to guarantee clear and audible sound.
- Software Permissions: Confirm that the screen recording software has the necessary permission to access your microphone. Some applications may require explicit permission to record audio.
- External Factor: Be mindful of external factors such as background noise or interference. Recording in a quiet environment can significantly improve audio quality.
File Saving Issues
- Check Storage Space: Ensure that you have sufficient space on your storage device. Running out of space can lead to recording interruptions or failure to save files.
- Select the Correct Destination: Double-check the designated folders or locations where your screen recordings are set to be saved. Make sure it’s accessible and has the necessary write permissions.
- File Format Compatibility: Verify that the selected file format for recording is compatible with your playback or editing software. Some formats may not be supported by certain applications.
Software Conflicts
Software conflict occurs when your screen recording software clashes with other applications or system processes. To troubleshoot software conflict, consider the following steps:
- Updated Software: Ensure that your screen recording software is up to date. Developers frequently release updates to address compatibility issues and improve overall performance.
- Check for Background Processes: Identify and close unnecessary background processes or applications. Running too many programs simultaneously can lead to conflict and affect recording stability.
- Compatibility Mode: Some screen recording software offers compatibility modes. Experiment with different settings to find the configuration that works best with your system and other applications.
Comparison: Mac vs Windows Keyboard Shortcuts to Record Screen
Featured Variations
This part highlights that while both Mac and Windows offer efficient keyboard shortcuts for screen recording, there are differences in the features they provide.
For example, Mac might have additional options or functionalities in its shortcuts that Windows doesn’t have, and vice versa. Users should be aware of these feature distinctions to choose the platform that aligns better with their specific needs.
User Preferences
The second point emphasizes that the choice between Mac and Windows shortcuts often comes down to individual user preferences.
Some users might find one system’s shortcuts more intuitive or easier to remember, while others may have a preference based on the overall user interface and experience.
Factors like familiarity and personal comfort with the operating system contribute to these preferences, making it a subjective choice for each user.
Screen Recording Tips
Selecting the Right Area
What it means: When you’re recording your screen, choose the part of the screen you want to capture.
Why it matters: It helps focus on what’s important, so you’re not recording unnecessary stuff. Imagine taking a picture – you want to capture the right moment.
Setting Audio Preferences
What it means: Adjusting how the sound is recorded during screen recording.
Why it matters: Good audio makes your recording better. Make sure the volume is right, and there are no weird noises. It’s like making sure the sound in a movie is clear and enjoyable.
Utilizing Editing Tools
What it means: Using tools to change or improve your recording after you’ve done it.
Why it matters: Sometimes, you might want to cut out a part or add something to your recording. Editing tools help you make your screen recording look and sound even better, just like editing a photo before you share it.
Real-life use cases
Educational purposes
Screen recording proves invaluable in educational settings, serving as a powerful tool for teachers and educators. Here’s how:
Visual Explanations:
Teachers can use screen recording to visually explain complex concepts. This includes demonstrating software, conducting virtual experiments, or guiding students through problem-solving processes.
Remote Learning:
In the time of learning from home on computers, recording the screen helps teachers make interesting videos for lessons. This way, students can watch and understand the lessons at their own speed, making it easier to learn and remember.
Feedback and Assessment:
Screen recording enables personalized feedback on assignments. Teachers can explain directly on the screen, providing detailed comments to aid student understanding.
Professional presentations
Professionals across various industries can elevate their presentation using screen recording techniques:
Demonstrating Software:
Professionals often need to showcase software functionalities during presentations. Screen recording allows for a step-by-step demonstration, ensuring clarity for the audience.
Enhanced Communication:
Instead of relying solely on static slides, professionals can incorporate dynamic screen recordings to communicate ideas effectively. This adds a personal touch and engages the audience.
Training Sessions:
Screen recording is a valuable asset in corporate training sessions. Trainers can create modules with detailed instructions, ensuring consistent and comprehensive training for employees.
Creating tutorials
Whether you’re a content creator or an individual sharing expertise, screen recording facilitates the creation of informative and engaging tutorials:
Step-by-Step Guides:
Tutorials often involve guiding viewers through a series of steps. Screen recording captures each action in real-time, providing a clear and detailed guide.
Software Walkthroughs:
For users learning new software or tools, a screen recording tutorial can be immensely helpful. It allows them to see the software in action, making the learning process more intuitive.
Skill Sharing:
Individuals with expertise in a particular skill or field can use screen recording to share their knowledge. This might include art techniques, coding practices, or any other skill that benefits from a visual demonstration.
Future Trends in Screen Recording
As technology continues to progress, we can expect significant advancements in screen recording tools. These improvements may encompass various aspects of the recording process, such as:
- Enhanced Quality: Future screen recording technologies may offer higher resolutions and frame rates, providing users with clearer and more detailed recordings.
- Efficient Compression: Advanced compression algorithms could be developed, allowing users to maintain high-quality recordings without consuming excessive storage space.
- Real-time Editing: Future tools might integrate real-time editing features, enabling users to make adjustments, add annotations, or apply filters while recording.
- AI Integration: Artificial Intelligence (AI) could play a more prominent role in screen recording, assisting users in automatic scene detection, background noise reduction, or even suggesting optimal recording settings.
- Multi-platform Compatibility: Screen recording tools may become more versatile, seamlessly integrating with various platforms and operating systems, providing a unified experience for users.
User Feedback and Reviews
Mac User Experiences
This section highlights the feedback and experiences of individuals who use Mac systems. It explores how Mac users perceive and interact with the Command + Shift + 5 shortcut, which is a comprehensive screen recording option on Mac.
The aim is to provide insights into the efficiency, simplicity, and versatility of this specific keyboard shortcut, as well as any additional comments or tips Mac users may offer based on their real-world experiences.
Windows User Feedback
In this part, the article examines the feedback and experiences of users who operate on Windows systems. It focuses on the Windows + Shift + S shortcut, a convenient way for Windows users to initiate screen captures.
The goal is to showcase how users find this shortcut in terms of ease of use, speed, and precision in capturing screen content. It may also touch upon any additional insights or preferences shared by Windows users regarding screen recording.
Security Considerations
Privacy Concerns
When engaging in screen recording, it’s crucial to be mindful of the content being captured. Privacy concerns arise when sensitive or confidential information is unintentionally included in the recording. This could include personal data, private conversations, or any information that should not be shared publicly.
To address privacy concerns:
- Content Review: Before sharing or storing the recorded file, carefully review its contents. Ensure that there is no sensitive information visible or audible in the recording.
- Selective Recording: Use screen recording tools that allow you to select specific areas of your screen. This ensures that only relevant content is captured, minimizing the risk of exposing private information.
- Privacy Settings: Familiarize yourself with the privacy settings of your recording software. Some tools may offer features to automatically blur or mask sensitive information during the recording process.
Protecting Recorded Files
Once you’ve completed a screen recording, the files become valuable assets that should be handled with care. Protecting these recorded files involves safeguarding them from unauthorized access, loss, or potential misuse.
Consider the following measures for protecting recorded files:
- Encryption: Implement encryption for your recorded files. This adds an extra layer of security, ensuring that even if the files are accessed, their content remains unreadable without the proper decryption key.
- Secure Storage: Choose secure storage locations for your recorded files. Avoid saving them in easily accessible or public folders. Utilize password-protected directories or cloud storage with robust security features.
- Access Control: Limit access to the recorded files only to authorized individuals. Password-protect your computer or the specific folders containing these files to prevent unauthorized users from viewing or editing them.
- Regular Backups: Regularly back up your recorded files to prevent loss due to unexpected events such as hardware failure or accidental deletion. This ensures that even if an issue occurs, you can restore your valuable recordings.
The Evolution of Screen Recording
Historical Perspective
In the past, screen recording was like taking pictures of your computer screen. It started with simple tools that allowed you to capture still images. Imagine it as a way to save what’s on your computer screen in a single snapshot.
Current Innovations
Now, things have become much more advanced. Screen recording isn’t just about taking pictures anymore. It’s like making a video of what’s happening on your computer. This video can capture everything you do on the screen, like moving the mouse, opening files, or showing presentations. It’s a more dynamic and interactive way of sharing what you’re doing on your computer.
FAQs
How do I find the recorded files on my Mac?
On your Mac, the recorded files are typically saved on the desktop or in the folder you specified during the recording process. Double-check these locations for easy access.
Can I use third-party software on Windows for screen recording?
Yes, there are numerous third-party applications available for Windows that provide additional features and customization options for screen recording. Explore different options to find the one that suits your needs.
What if I accidentally record sensitive information?
If you accidentally record sensitive information, exercise caution before sharing the recording. Utilize editing tools to remove or blur sensitive content to ensure privacy.
Are there keyboard shortcuts for specific applications?
Some applications may have their keyboard shortcuts for screen recording. Check the documentation or settings of the specific application for details on available shortcuts.
How much space does screen recording consume?
The space required for screen recordings depends on duration, resolution, and quality. Monitor your storage capacity to avoid running out of space, especially for extended recording sessions.
What are some common issues I might encounter during screen recording?
Common issues include audio problems, file-saving difficulties, and software conflicts. Ensure your audio settings are configured correctly, double-check your storage location, and update your recording software to troubleshoot these issues.
How can screen recording enhance professional presentation?
Screen recording adds a dynamic element to professional presentation by allowing users to demonstrate software, showcase workflows, and highlight key points visually. It enhances engagement and provides a more immersive experience for the audience.
Conclusion
In conclusion, using keyboard shortcuts to record your screen on Mac and Windows is like having a superpower for your computer. These shortcuts, like command + Shift + 5 on Mac or Windows + Shift + S on Windows, make capturing and sharing what’s on your screen super easy and quick.
Making these shortcuts a part of your routine saves time and work more smoothly. As technology improves, we can expect even chill features for screen recording.
So, try out these shortcuts, customize them to your liking, and enjoy making your digital experience simpler and more efficient.


